Deploying a small Rails app on a Raspberry Pi Zero 2W with Kamal and Cloudflare Tunnel
My life partner is a psychologist who mainly work with people with autism. He once asked for a small solution so he could create little, simplistic, easy to follow recipes with AI generated icons for his patients. So I built him a Rails app, just for him, and I wondered: since it will be used just for him, maybe we could have our own little personnal server to deploy the app to?
So I deployed it on a Raspberry Pi Zero 2W sitting on my desk, using Kamal for deployment and Cloudflare Tunnel for secure public access.
This is the story of how I did it!
The stack
- Rails 8.0.1 with SQLite
- Ruby 3.2.0
- Kamal 2 for deployment
- Docker on the Pi
- Cloudflare Tunnel for public access (no port forwarding needed)
- Raspberry Pi Zero 2W (ARM64, 512MB RAM)
⚠️ A word of warning before you start
This setup is for fun and learning. It is not production-ready. The Pi Zero 2W has 512MB of RAM: enough for a single user, but it will struggle under any real load. If you’re building something serious, use a VPS.
That said, if you want to learn Kamal, Docker, and Cloudflare Tunnel hands-on, this is a fantastic playground.
Why the Pi Zero 2W specifically?
I used a Pi Zero 2W because it had the great advantage to be already in my drawer… However, I also liked the idea of checking if such a small computer could run docker and a rails app. Luckily for me, it runs ARM64 (aarch64), which means there is full Docker support and official Ruby images!
Step 1: Flash the SD card
Don’t hesitate to check the official Raspberry Pi documentation if you’re not familiar with the process. Use Raspberry Pi Imager with you SD card.
You need to select as an OS the Raspberry Pi OS Lite, not the full version: we do not need a desktop environment, since we’ll only access the Pi through SSH.
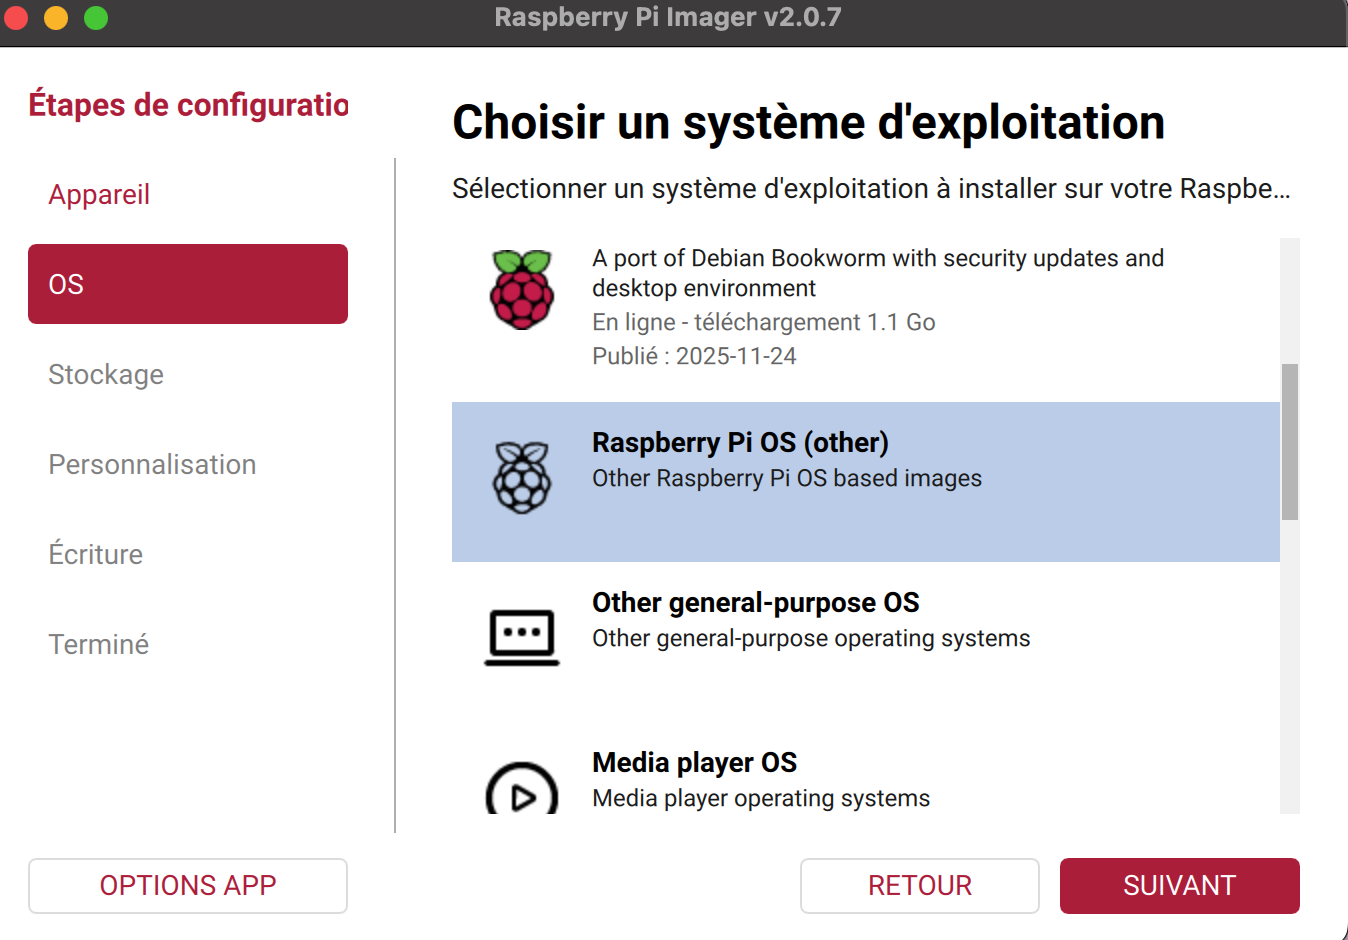
click on "other" to display the full list. You'll find the OS we need in that list
During the setup, you’ll need to:
- Set your WiFi credentials
- Set a hostname (from now on, we’ll call it
server) - Create a user / password for the Pi (from now one, we’ll call the user
username) - Enable SSH
- Choose public key authentication only (paste your
~/.ssh/id_ed25519.pub)
Why public key over password? Because it’s much safer!
Step 2: Connect and update
ssh username@server.local
sudo apt update && sudo apt upgrade -y
While you’re at it, set up an SSH alias on your computer for convenience. In ~/.ssh/config:
Host pi
  HostName server.local
  User username
  IdentityFile ~/.ssh/id_ed25519
Now, you can use ssh pi. server.local will access the machine called “server” on your local network. Please note that you have to be on the same wifi as your pi, because we haven’t made your machine visible on the internet just yet.
Step 3: Install Docker
Follow the official Docker documentation.
sudo apt update
sudo apt install ca-certificates curl
sudo install -m 0755 -d /etc/apt/keyrings
sudo curl -fsSL https://download.docker.com/linux/debian/gpg -o /etc/apt/keyrings/docker.asc
sudo chmod a+r /etc/apt/keyrings/docker.asc

# Add the repository to Apt sources:
sudo tee /etc/apt/sources.list.d/docker.sources <<EOF
Types: deb
URIs: https://download.docker.com/linux/debian
Suites: $(. /etc/os-release && echo "$VERSION_CODENAME")
Components: stable
Architectures: $(dpkg --print-architecture)
Signed-By: /etc/apt/keyrings/docker.asc
EOF

sudo apt update
sudo apt install docker-ce docker-ce-cli containerd.io docker-buildx-plugin docker-compose-plugin

sudo systemctl status docker

# Test the installation:
docker run hello-world
Then you’ll need to add docker to your user group. Without it, docker won’t be able to access the Pi’s resources because of privilege issues. It’s well explained in the official documentation.
sudo groupadd docker
sudo usermod -aG docker $USER
Step 4: Configure kamal
Assuming you have an app working on your local machine, check that Kamal is in your Gemfile (gem "kamal", require: false). We’ll now update the deploy.yml file, which is the script that kamal will use to :
- Setup a docker image
- Push it to a registry (in our case, Docker Hub)
- Pull it to the Pi
But before modifying this file, we’ll need to sign up to dockerhub. If you don’t have an account, you can create one here. From now one, we’ll call ours dockerhubuser.
You’ll need also secrets : the first one would be your rails master key (or config/credentials/production.key if you use rails credentials), and the second one would be your Docker Hub registry password, that you can easily get from the Docker Hub website.
Never put raw credentials in .kamal/secrets. Instead, read them from your environment or a password manager. I use KeePassXC:
KAMAL_REGISTRY_PASSWORD=$(keepassxc-cli show /path/to/base.kdbx -a Password  KAMAL_REGISTRY_PASSWORD)

RAILS_MASTER_KEY=$(keepassxc-cli show /path/to/base.kdbx -a Password RAILS_MASTER_KEY)
Also, you’ll need to check your local IP of the Pi. Type hostname -I via SSH and it should be the first one popping. We’ll call ours 123.456.7.890.
# Name of your application. Used to uniquely configure containers.
service: yourappname
deploy_timeout: 120 # we need to increade the default timeout, because your pi is a 15 € computer that is slow!
# Name of your user, and the container image.
image: dockerhubuser/yourappname

# Deploy to these servers.
servers:
  web:
    - 123.456.7.890 # Local IP of the Pi
proxy:
  ssl: false # no need for kamal-proxy to handle that, Cloudflare handles SSL
  host: your-app.com
  response_timeout: 120 # we need to increment that as well

# Credentials for your image host.
registry:
  username: dockerhubuser # your dockerhub username
  # Always use an access token rather than real password when possible.
  password:
    - KAMAL_REGISTRY_PASSWORD

# Inject ENV variables into containers (secrets come from .kamal/secrets).
env:
  secret:
    - RAILS_MASTER_KEY
  clear:
    # My app is super simple, with no jobs. However, even if there was jobs, I'd use this option because I cannot afford to have a dedicated queue server. Again, it's a 15 € computer...
    SOLID_QUEUE_IN_PUMA: true
aliases:
  console: app exec --interactive --reuse "bin/rails console"
  shell: app exec --interactive --reuse "bash"
  logs: app logs -f
  dbc: app exec --interactive --reuse "bin/rails dbconsole"


# My app uses SQLite, with a single database file.
volumes:
  - "my_app_storage:/rails/storage"
asset_path: /rails/public/assets
builder:
  arch: arm64
ssh:
  user: youruser # your username on the Pi
Step 5: Deploy
kamal setup   # First time only: installs Docker, sets up volumes, pulls kamal-proxy
kamal deploy  # Subsequent deploys
Now, our app is running on the Pi! To test it, just run this on a computer running on the same router as the Pi:
curl -H "Host: your-app.com" 123.456.7.890
The -H flag adds the Host header manually: necessary because kamal-proxy routes requests based on the hostname, not the IP address.
Step 6: buying a domain
I did that on cloudflare registrar. It’s pretty easy to use. Once you’ve bought your domain do not add any CNAME, A or AAAA record. For now, you have a domain, a server running, but you still need to make a bridge between the Pi and the internet, so that the DNS knows where to send the traffic when a user hits your domain.
Step 7: Public access with Cloudflare Tunnel
Why not port forwarding?
My first instinct was to open port 80 on my wifi box and point a DNS A record to my public IP. However, I wasn’t super comfortable with having my home IP exposed on the internet, and I didn’t want to deal with DDNS: my router changes the would have changed its IP from time to time, so I would have needed to make a script to update my DNS record every time.
So the solution is to create a direct tunnel between the Pi and the internet: you have a daemon running on the Pi that makes a direct connection to Cloudflare, and Cloudflare handles the rest.
Install cloudflared
Go to the cloudflare dashboard and create a new tunnel.
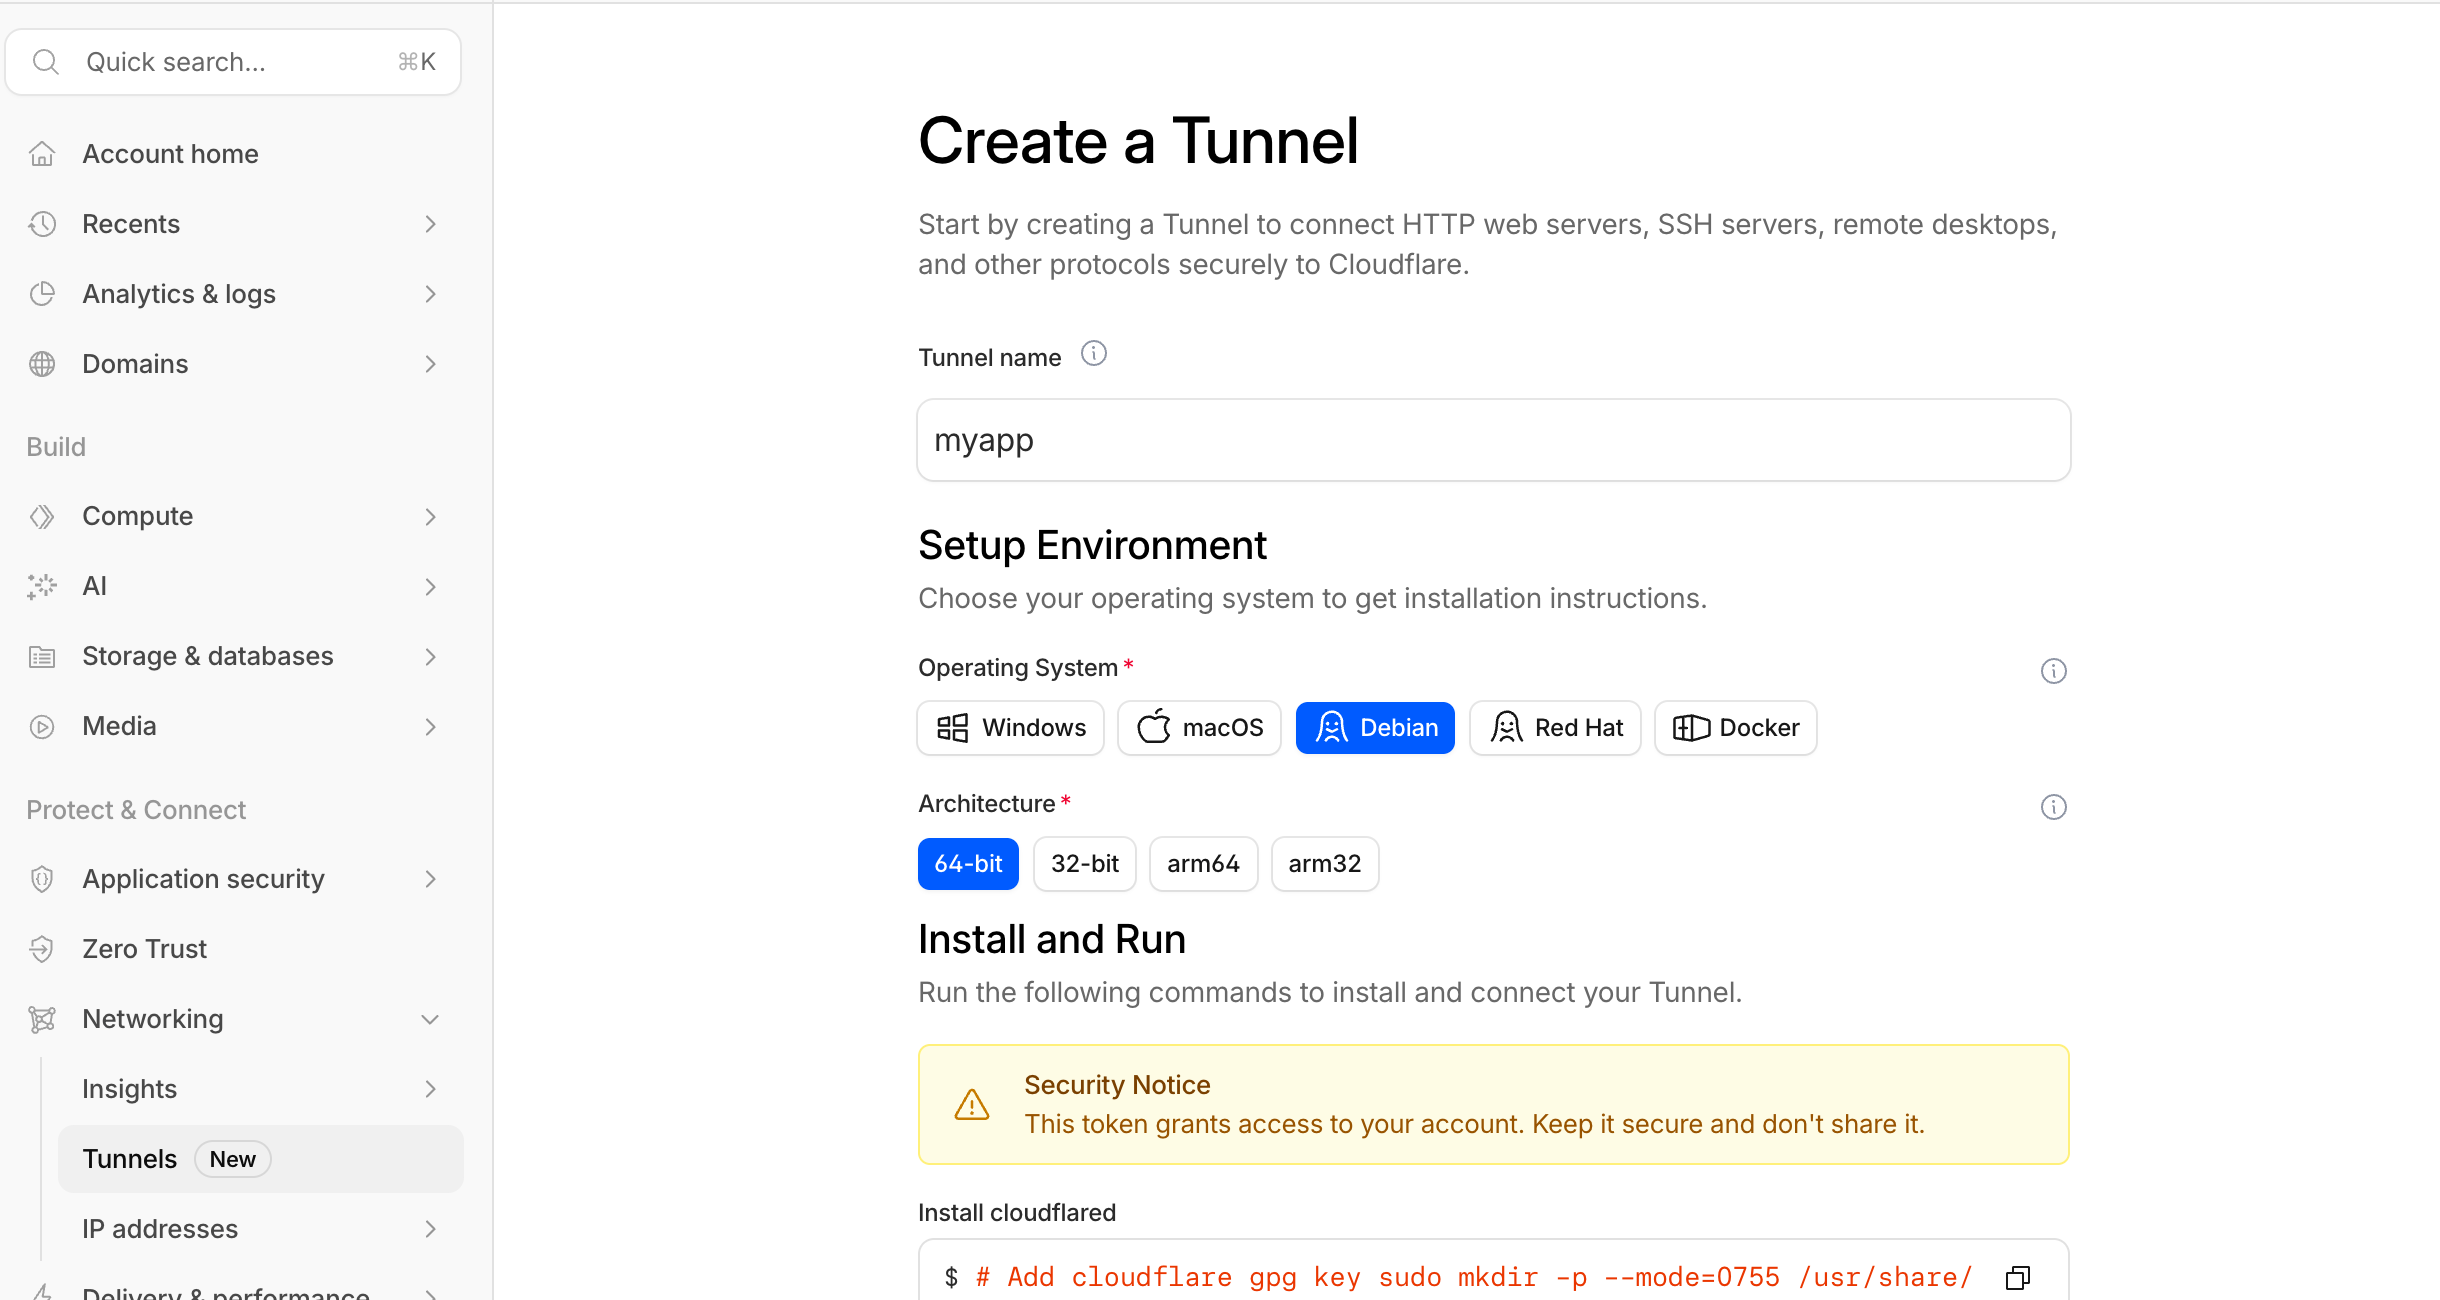
the cloudflare tunnel dashboard
Follow the instructions and install cloudflared as a service.
# Add cloudflare gpg key
sudo mkdir -p --mode=0755 /usr/share/keyrings
curl -fsSL https://pkg.cloudflare.com/cloudflare-main.gpg | sudo tee /usr/share/keyrings/cloudflare-main.gpg >/dev/null

# Add this repo to your apt repositories
echo 'deb [signed-by=/usr/share/keyrings/cloudflare-main.gpg] https://pkg.cloudflare.com/cloudflared any main' | sudo tee /etc/apt/sources.list.d/cloudflared.list

# install cloudflared
sudo apt-get update && sudo apt-get install cloudflared

# Use your app token from the dashboard
sudo cloudflared service install APPTOKEN
Configure the tunnel
Then you can go on your tunnel page, add a route, click on “published application”. Select your domain, and add http://172.17.0.1:80 as the service URL. This basically tells the daemon in your Pi to forward traffic on the Pi’s port 80.
Why 172.17.0.1 and not localhost?
This tripped me up. cloudflared runs as a normal process on the Pi. Kamal-proxy runs inside Docker, which has its own isolated network. From cloudflared’s perspective, localhost is the Pi’s own process space. Kamal-proxy isn’t there.
172.17.0.1 is the Docker bridge gateway, the fixed IP that lets processes on the Pi reach containers running in Docker. It’s not accessible from outside the Pi, so it’s just as secure as localhost, just reachable from the right context.
DNS
Cloudflare automatically creates a CNAME record pointing your-app.com to your-tunnel-id.cfargotunnel.com. No A record, no IP address, no DDNS. Simple as that!
Now you should be able to access your app on your-app.com!
Useful commands
# Deploy a new version
kamal deploy

# Open a production Rails console
kamal console

# Tail production logs
kamal logs

# Open a bash shell in the container
kamal shell
Step 8: The architecture
Let’s have a look at how our small app architecture will look like:
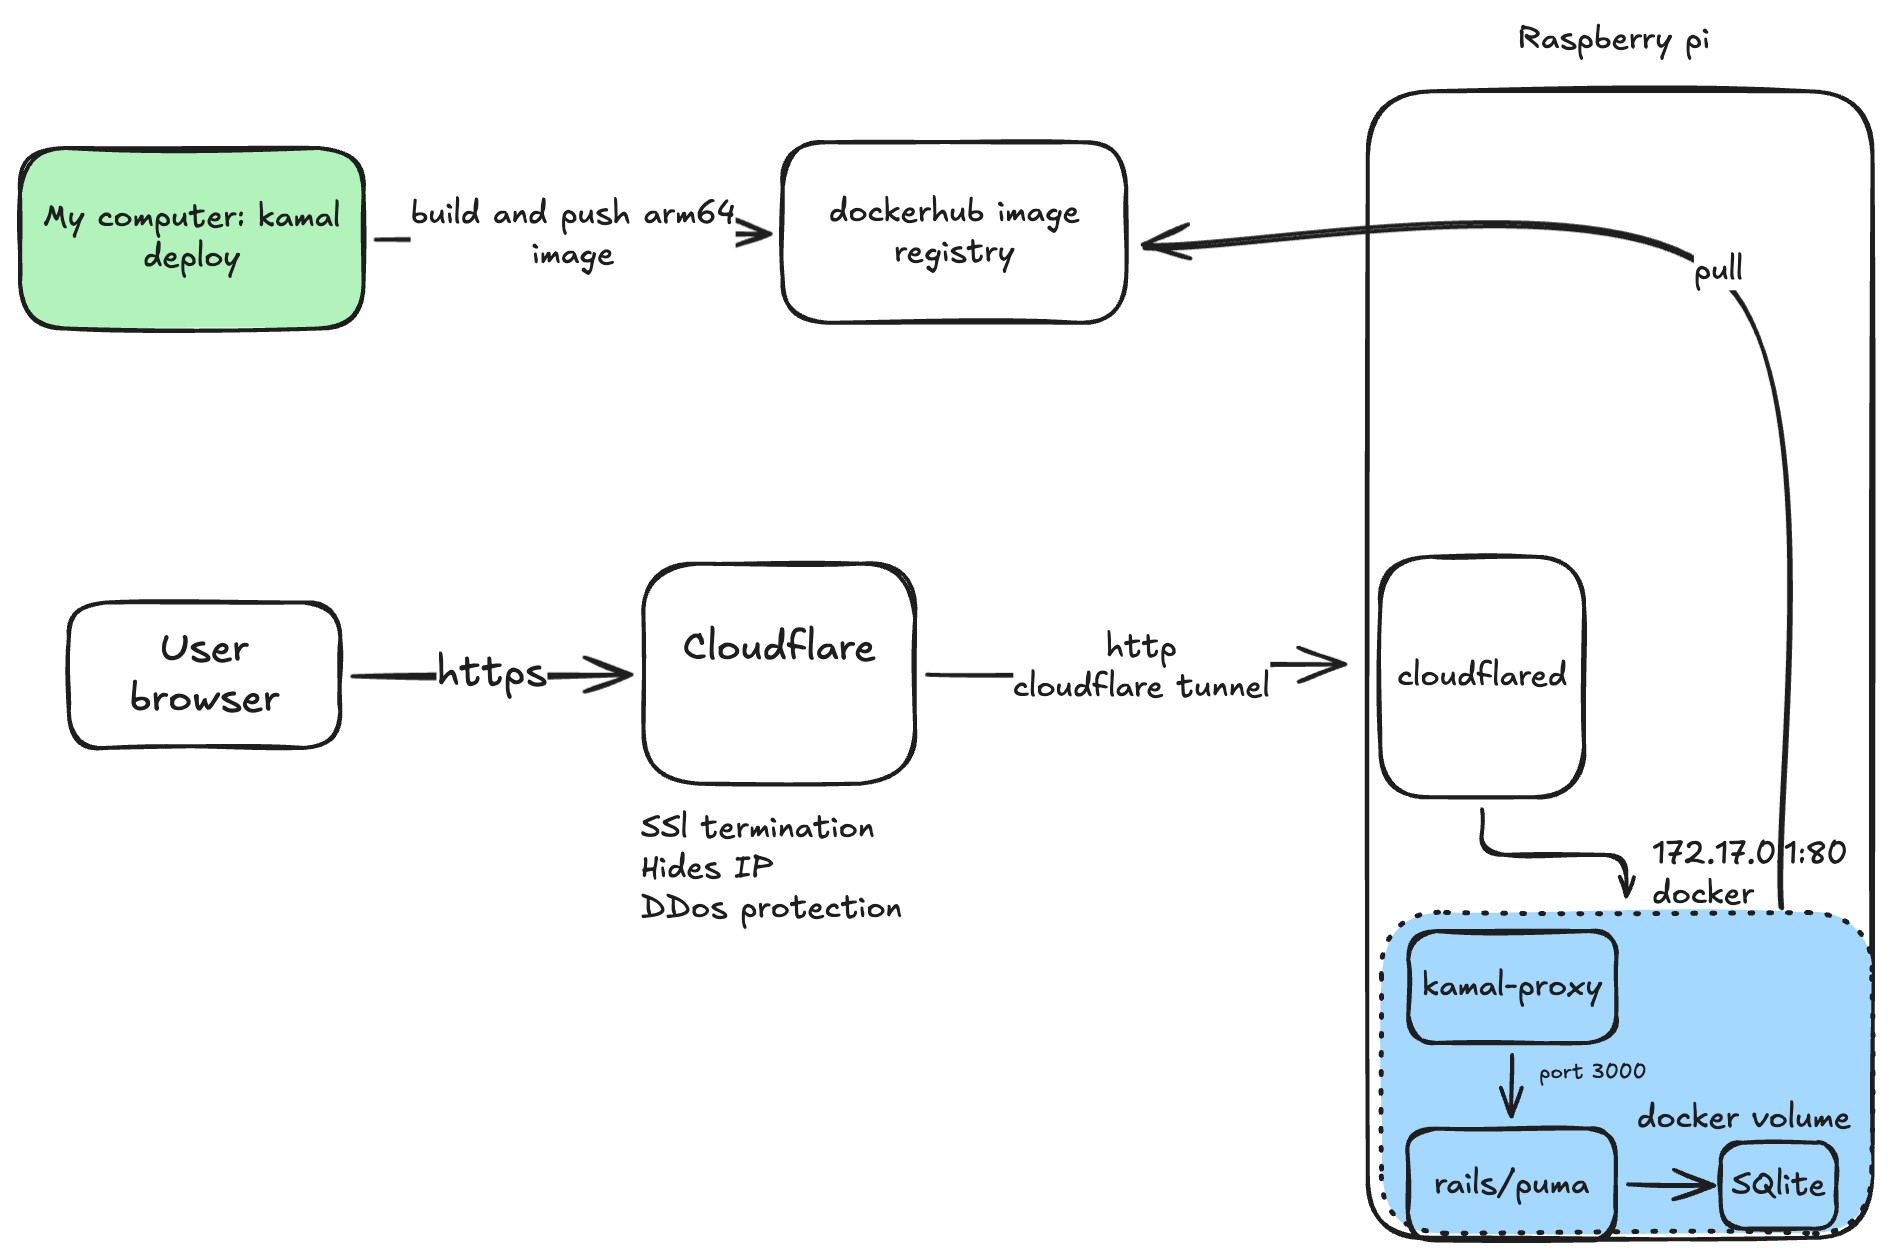
the infra architecture
Let’s explain the different components :
-
kamal deploy on your Mac When you run
kamal deploy, your Mac builds a Docker image compiled for the arm64 architecture (required for the Pi Zero 2W) and pushes it to Docker Hub. -
Docker Hub → Pi (pull) The Docker daemon on the Pi pulls the new image from Docker Hub. This happens automatically as part of the deploy: you don’t need to SSH into the Pi manually.
-
User browser → Cloudflare (HTTPS) The user types your domain in their browser. The request hits Cloudflare over HTTPS. Cloudflare handles three things here: SSL termination (decrypts the traffic), hides your home IP address, and provides DDoS protection.
-
Cloudflare → cloudflared (HTTP via tunnel) Cloudflare forwards the decrypted request as plain HTTP through the Cloudflare Tunnel to the cloudflared daemon running on the Pi. No ports need to be open on your router: cloudflared maintains a persistent outbound connection to Cloudflare.
-
cloudflared → kamal-proxy (172.17.0.1:80) cloudflared forwards the request to 172.17.0.1:80, the Docker bridge gateway IP. This is the address that allows a normal process on the Pi to reach containers running inside Docker. localhost doesn’t work here because cloudflared and Docker live in separate network namespaces.
-
kamal-proxy → Rails/Puma (port 3000) kamal-proxy receives the request, inspects the Host header, and forwards it to the Rails container on port 3000. It also manages zero-downtime deploys by keeping the old container alive until the new one is healthy.
-
Rails/Puma → SQLite (Docker volume) Rails processes the request and reads/writes data to SQLite. The database file lives in a Docker volume mounted at /rails/storage, so it persists across deployments.
Conclusion
I hope this post was useful to you. I had so much fun building this little app, and I learned a lot about Docker, Kamal, tunnels, DNS records, and the architecture of a dockerized Rails app.
See you next time!